DMAIC- Measuring the PVC Pipe Manufacturing Process
Sachin Mahendru*, Bikramjit Singh
Department of Mechanical Engineering, MM University, Ambala, India
Abstract
It is a conceptual paper to demonstrate the importance of application of Six Sigma DMAIC methodlogy to a PVC pipe manufacturing process and to realize the role played by measure phase for successful completion of Six Sigma. Measure phase measures the potential of the process. It is important to study the existing process in order to formulate the improvement strategies. It entails a method to execute measure phase in a comprehensive manner so that this phase reflects the actual process. It acts as road map for the researchers for executing measure phase using appropriate tool. A case study has been conducted in a PVC manufacturing plant to execute measure phase to produce breakthrough results in real world environment.
Keywords
DMAIC, SIPOC Diagram, FMEA, Cp, PVC Pipe Manufacturing, MSA, Gauge R & R, Bias Study
Received: March 9, 2015
Accepted: May 3, 2015
Published online: May 28, 2015
@ 2015 The Authors. Published by American Institute of Science. This Open Access article is under the CC BY-NC license. http://creativecommons.org/licenses/by-nc/4.0/
1. Introduction
Six Sigma is employed to improve the process by attacking the critical parameters of the process to improve the process capability of the process. Six Sigma can be implemented by DMAIC (Define, measure, analyze, improve and Control) approach. A Six Sigma project is divided into five phases. The first phase is defining the problem that needs to be solved. Second phase is measuring the existing process. Third step is analyzing the process. Fourth step is improving the process and fifth step is control wherein the process is validated over a span of time. Every phase has its own importance. This paper focuses on importance of measure phase of Six Sigma project. Operation measurement being a critical phase is usually an area of neglects by most of the enterprises especially in the SME sector, which results in poor quality and quantity standards and thus on the whole, results in creating bottlenecks in the path of their future growth [1].
2. Research Significance
Sigma is symbol in probability used to represent standard deviation. Six Sigma represents six standard deviations from average of a data set. Six Sigma is also a process improvement methodology that seeks to bring a process or product to six sigma standards. If data samples are taken over a long period of time or for a large data set, roughly 68% of the data will fall within the first standard deviation markers above and below average. At six sigma 9.9997% of data will land within six standard deviations range. Six Sigma as a process improvement methodology seeks to improve a process until it has 3.4 or fewer defects per million products. Six Sigma projects can also seek 3.4 or fewer defects per million opportunities. Six sigma theories are based on the idea that all processes produce outcomes with a normal distribution over time. Six Sigma theory also states that an average and sigma or standard deviation can be calculated from this process, allowing Six Sigma boundaries and process control charts to be calculated. Six Sigma projects tools are then used to reduction variation in the process or reduce defect rates. Six Sigma is a systematic tool that can be applied to manufacturing process that has already been designed, it can also be applied to a process which is yet to be designed. Different ways through which six sigma can be implemented are:
1. DMADV or DFSS (Define, Measure, Analyze, Define, Verify)
2. DMAIC(Define, Measure Analyze, Improve, Control)
3. DMARDV(Define, Measure, Analyze, Redesign, Verify)
DMADV is used for projects aimed at creating new product or process designs.
DMAIC is used for projects aimed at improving an existing business process.
DMARDV is used for projects at eliminating flaws in the existing process
As in present case, there is existing PVC pipe manufacturing process this is a case study work so DMAIC approach was more appropriate.
3. Case Study
The Indian PVC pipes market is growing at a healthy rate. The durability of PVC pipes along with the various applications makes it the preferred option over conventional pipes. Furthermore, the construction sector and the agricultural sector are expected to boost demand for PVC pipes in the future. The agricultural sector uses PVC pipes in a big way for all their agricultural needs. The beneficial properties of PVC boosts the demand for PVC pipes compared to other types of pipes which also gives rise to replacement demand. This research work will be carried out at Patiala Polymers Ltd, prominent manufacturer, exporter, importer and supplier of pipes and fittings for varied applications. Incorporated in, at Patiala, (Punjab, India), "Patiala Polymers," are a leading organization engaged in offering an extensive range of Pipes and Fittings for varied applications. They are a distinguished Manufacturer and Supplier of superior quality PVC Pipes, HDPE Pipes, Electrical Conduits and Flexible PVC Pipes. Organization ISO certified company.PVC pipes are produced by extrusion process. Resins are important raw material for making PVC pipes. PVC resins, I-OCTYL PHTHALATE (DOP), stabilizer, processing acids, colorant and filler are raw materials for extrusion process. The various process steps involved in the manufacture of rigid PVC pipes are as follows:
1. Mixing
2. Extrusion Process
3. Haul off
4. Cooling
5. Cutting
6. Inspection
4. Methodology Adopted (DMAIC)
At the heart of the Six Sigma methodology is the ‘define, measure, analyze, improve, and control’ (DMAIC) model for bottleneck processes that fall below specifications and seek incremental improvement. DMAIC (pronounced ‘Duh-MAY-ick’) is a structured problem-solving methodology widely used in diversified businesses [2]. In brief, the DMAIC methodology has five phases [3]:
· Define the problem, the voice of the customer and the project goals, specifically.
· Measure key aspects of the current process and collect relevant data [4].
· Analyze the data to investigate and verify cause-and-effect relationships. Determine what the relationships are and attempt to ensure that all factors have been considered. Seek out root cause of the defect under investigation [5].
· Improve or optimize the current process based upon data analysis techniques such as design of experiments, Poka-Yoke or mistake proofing and standard work, etc., to create a new future state process. Set up pilot runs to establish process capability.
· Control the future state process to ensure that any deviations from target are corrected before they result in defects. Implement control systems such as statistical process control, score boards, visual controls and monitoring tools for the process [6].
These phases lead the Six Sigma’s team logically, from defining a problem through implementing solutions linked to underlying causes and establishing best practices to make sure the solutions stay in place. Operation/process measurement is the vital phase that comes into picture immediately after defining the problem [7].
Operation measurement being a critical phase is usually an area of neglects by most of the enterprises specially in the SME sector, which results in poor quality and quantity standards and thus on the whole, results in creating bottlenecks in the path of their future growth [1].
Measure phase act as a road map for short listing the relevant measurement tools for implementation of Six Sigma. It has been found that doing ‘wrong operation measurement’ is one of the major reasons for failure of DMAIC [8]. One of the goals of the Measure phase is to pin-point the location or source of a problem as precisely as possible by building a factual understanding of existing process conditions. An important part of Measure is to establish a baseline capability level by actually calculating the pipe extrusion process capability index (Cpk). After performing detail literature review, various problems that are usually being faced in the measurement phase, have been discussed briefly as under:
· Lack of awareness: Education plays a vital role in creating awareness. Education system in a country like India does not takes into account the importance of measurement from an industrial point of view. Interaction of SMEs with various research institutes and universities, causes stress on management and interns creates hurdle in the overall growth [9]. This may cause wrong selection of key process metrics and further data may be collected in some non-compatible form with respect to present production environments.
· Lack of skilled manpower: Skilled workers bring degree of expertise to the performance of a given job. Low turnover is one of the results of unskilled workforce. Workers with skills are in short supply and it becomes a shortfall that marks another obstacle to the global economic recovery [10].
· Non-application of high precision tools and equipments: With changing times and throughout advancement in technology, measurement tools and equipments have also been upgraded themselves [11]. In SME’s various highly précised measurement equipments are not being used, resulting in their declining growth in developing nations [12]. Along with their non-application, there are several issues beyond accuracy that restrict the usability of advanced metrology methods. These include poor manufacturing environments and need of high initial investments. These factors create a major hurdle in an industry’s quality and quantity standards [13]. There is need for workforce to understand measurement system analysis (MSA) and its elements like bias, linearity, Gauge repeatability and reproducibility (Gauge R&R) and stability of measuring equipments, etc.
· No/expensive calibration done: All measuring instruments are subject to varying degrees of instrument error and measurement uncertainty [14]. Calibration is an essential process that needs to be repeated after fixed interval of time. Although calibration techniques are expensive, but these are being vital to be adopted for improved and accurate results.
· Lack of R&D: Many SMEs do not have Research and development facilities in their premises, either because they have little or no in-house R&D capacity or because their R&D facility lies in some another domain or sector [15]. Generally, management considers spending on R&D as wastage of time and money despite not realizing the importance of research and development the SMEs lag behind in the upcoming standards.
· No investment in re-training: Imparting re-training to the workforce is a key essential for improved growth. Re-training helps the manpower to re-enhance their technical skills and knowledge about the new up gradations of measuring equipments. SME’s usually avoids on the job training concepts [16].
5. Laying the Roadmap for Measure Phase
In measure phase real time data was collected in order to analyze the process in the subsequent phases. The process was measured in order to determine current performance and to quantify the problem. Tools that were employed in Measure phase included SIPOC diagram, Pareto analysis, root cause analysis, measurement system analysis and gauge repeatability & reproducibility. SIPOC provided analysis of the various steps that were involved in PVC pipe manufacturing, input & output of every step thereby laying down the complete process on a one sheet. It was followed by prioritizing the reasons for poor COPQ that helped in focusing the study on vital defects. After this root cause analysis was done on order to find out the various reasons for process variation. Measurement system analysis was conducted to check the bias in the digital weighing balance and gauge R&R was employed for micrometer that was used to measure the wall thickness of the pipes.
5.1. SIPOC
SIPOC contains information about the processes involved in PVC pipe manufacturing (refer to Figure 1). In SIPOC input parameters, process description and customer pertaining to different processes involved are shown systematically. PVC pipe manufacturing process starts with mixing process. In mixing raw materials in required proportion were mixed together to form mixed powder. Next process was pushing mixed raw material to the screw and barrel. Screw and barrel push the raw material to die and mandrel where forming takes place. Fused powder takes the shape of PVC pipe, it was then followed by cooling of pipe in cooling tank with the help of 20 nozzles. Extruded pipe was pulled by Haul-off, subsequently followed by stamping and cutting of the pipe into lengths of 6 meter.
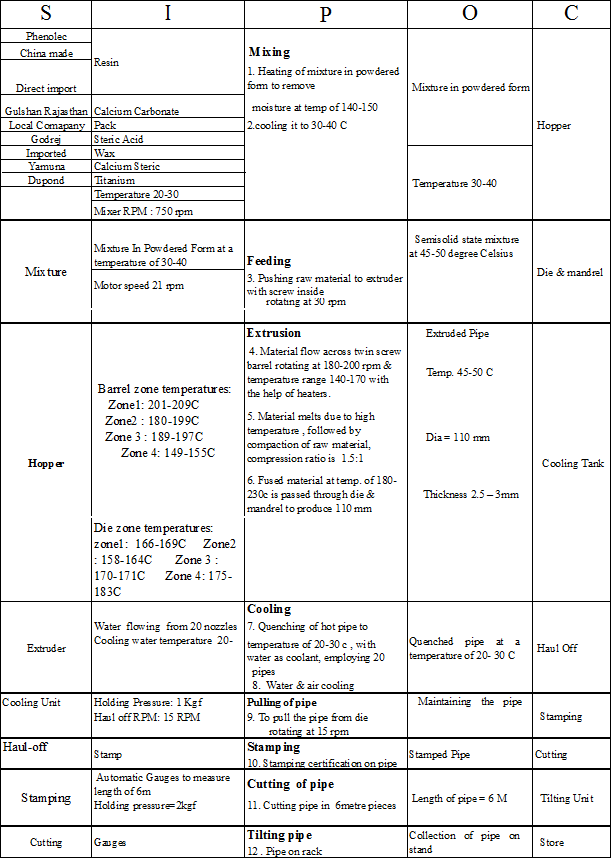
Figure 1. SIPOC Diagram.
Every process of PVC pipe manufacturing is very important to manufacture pipes as per customer’s requirement. Value is added at each step as clear from SIPOC diagram. SIPOC also depicts the process input parameters at each stage. When we consider feeding process, the supplier is mixture, input process parameters are mixture in powdered from at temperature of 30-400 C and motor RPM are 21. Output of the process is semi solid state mixture at 45-500C and the customer to the process is Die & mandril.
5.2. Prioritize the Reason for Poor COPQ
The reasons for poor COPQ were analyzed using Pareto diagram (refer to Figure 2). Defects were plotted with Loss per month. Defects were organized from higher to lower in term of loss. Commutative effect of the defects was studied.
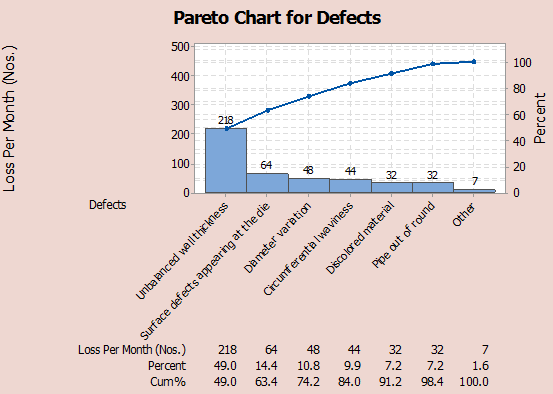
Figure 2. Pareto Chart.
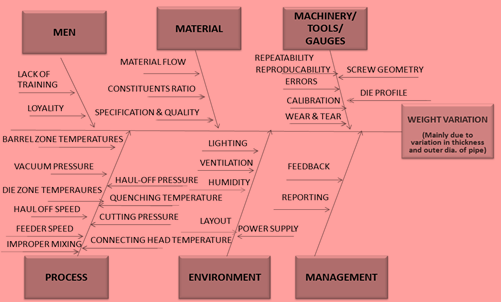
Figure 3. Root Cause Analysis.
It was found unbalanced wall thickness, surface defects, diameter variation constitutes more than 80 % of the defects. Around 330 pieces were scraped due to these defects. Unbalanced wall thickness was major defect that was present and required immediate attention & give breakthrough process improvement.
5.3. Root Cause Analysis
Wall thickness of the pipe had direct impact on the weight of the pipe. In root cause analysis, major causes for weight variation were found and bifurcated under different headings, viz, men, material, machinery, tool, process, environment and management (refer to Figure 3). Under process, the various reasons for weight variation were barrel zone temperature, vacuum pressure, screw geometry, haul-off speed, feeder RPM, improper mixing of the constituents, haul-off pressure, quenching temperature, cutting temperature & connecting head temperature. Under men, reasons were lack of training and loyalty. Under material reasons included material flow, constituent ratio, specification and quality of raw material. Factors of weight variation due to machinery were repeatability & reproducibility, wear & tear, screw geometry, die profile etc. As depicted from the Figure 5.9, in the similar manner various causes under environment and management heading were found.
The next step was to find the critical to process parameters from root cause diagram. The parameters were sub-divided into Controllable parameters, Parameters out of control & Noise parameters (refer to Figure 4). Controlled parameters are those parameters that are in control during the process, includes the factors like constituent ratio in mixture, screw geometry of barrel, power supply, human error, layout and cutting pressure.

Figure 4. Critical to Process Parameters.
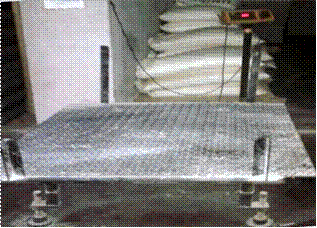
Figure 5. Weighing Balance.
Out of control parameters are the parameters that are out of control but they can be controlled. Feeder RPM, Barrel zone temperatures, connecting head temperature, Die zone temperature, quenching temperature and haul-off RPM are out of control parameters. Noise parameters are the parameters that cannot be controlled but may affect the process. Humidity, loyalty, wear & tear, feedback and report are noise parameters.
5.4. Measurement System Analysis
Majorly weight and wall thickness are critical parameters. These are measured and monitored with weighing balance and vernier caliper. So before moving to analyze phase it was important to check these measuring instruments. MSA was conducted to check the bias in the digital weighing balance and Gauge R&R for checking vernier caliper. Digital weighing balance was checked for bias. A bias study was conducted. Bias study is generally conducted to check for the bias in the measurement system. Figure 5 shows the digital weighing balance that will be used to weigh pipes.
Hypothesis and null hypothesis were formulated as:
H0: No bias in weighing
Ha: Weighing balance has bias
In bias study difference between observed value, reference value & average measurement was studied. A set of 15 readings were taken to conduct bias study (refer to Figure 6). A reference value of 12 Kg was taken as overall mean. Least count of weighing balance was .001 Kg. "O" reading was computed to be 0.193286 which is between -0.53668 & 0.29468 as it is between positive 0.29468 and negative value 0.53668 (refer to Figure 6).
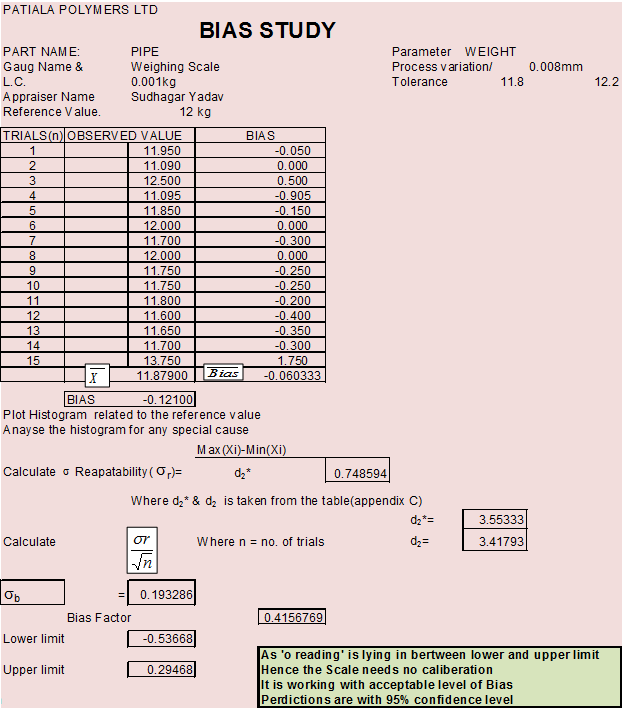
Figure 6. Bias Study.
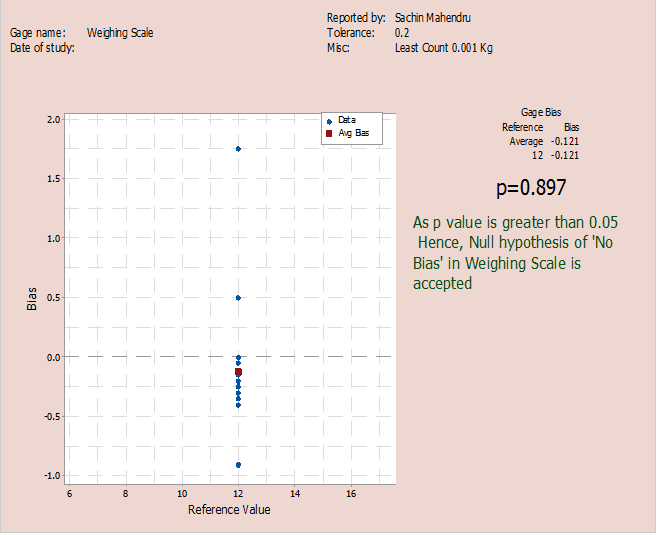
Figure 7. Bias Report of weighing Balance.
Hence, the weighing balance needs was working with acceptable level of bias & need no calibration at this moment. This prediction was with 95% confidence.
As clear from Bias report P=0.897 which is greater than 0.05(refer to Figure 7). Hence null hypothesis is accepted that there is no significant bias in weighing scale.
5.5. Gauge R&R
Repeatability and reproducibility are important properties of a measuring instrument. A gauge R&R study was conducted to check repeatability and reproducibility of micrometer. Micrometer is used to measure the wall thickness. As Wall thickness is one of the critical parameter. So it was important to check the gage (micrometer) before conducting further study.
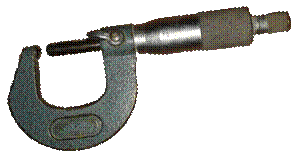
Figure 8. Micrometer.
In Gauge R&R study three operators took 10 readings of wall thickness of 10 pipes, each pipe was repeated thrice to check the repeatability (refer to Figure 9).
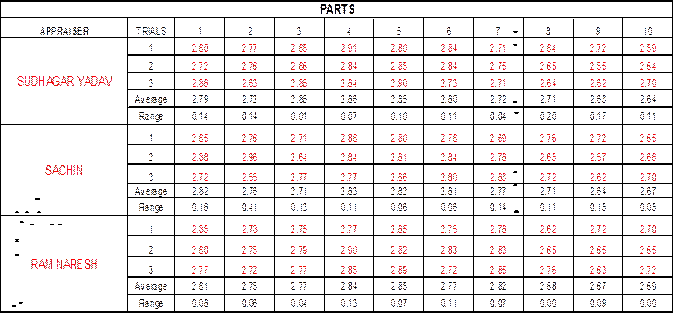
Figure 9. Gauge R & R readings.
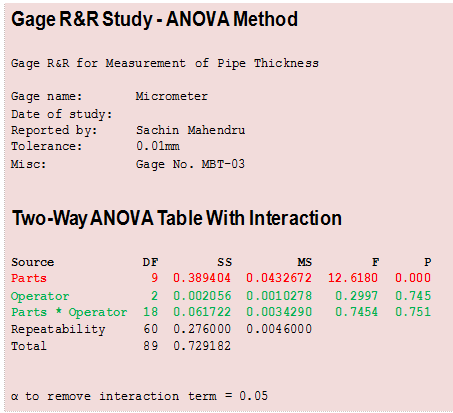
Figure 10. Gage R&R Statistic.
First of all first pipe’s thickness was measured three times by first operator, then average and range of readings were calculated. This procedure was repeated by two more operators for 10 pipes. Micrometer’s reproducibility and repeatability was calculated on the basis of this data calculated. It was followed by application of two way ANOVA (refer to Figure 10), it can be depicted from the report that variation among operators was under control (having P value 0.745), variation among part and operator was also satisfactory (having P value 0.751), however, variation among the parts was not satisfactory (P value is 0).
Figure 11 shows Gage R&R (ANOVA) report of micrometer having least count 0.01 mm. First figure is showing component variation among gauge R&R, Repeatability, reproducibility and part to part variation. Second figure is Showing X chart with upper control limit 3mm & lower control limit 2.50 mm of pipe thickness.
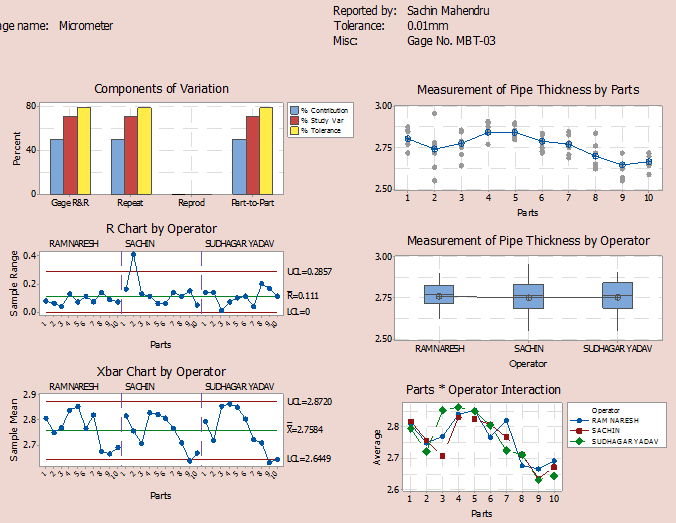
Figure 11. Gage R&R Report for measurement of pipe thickness.
Third Figure is showing R chart by three operators & R bar value came out to be 0.111. Fourth figure is showing Box plot as the line joining three boxes is a straight line so reproducibility of the micrometer is up to mark. Fifth diagram is showing X chart by three operators, showing the repeatability of micrometer is poor as variation is high. Sixth figure is showing parts operator interaction, showing red, green & blue lines. All the lines are overlapping so reproducibility of micrometer is OK. The measurement system variation was calculated, it was 70.7%. The process variation was estimated from the parts in the study. If variation is
<10%: acceptable
10% - 30%: marginal
>30%: unacceptable
The variation in repeatability was 70.7% of the total variation in the process. So the repeatability of micrometer was poor. However, reproducibility is up to the mark. So micrometer needed to be calibrated before going to next phase, micrometer was calibrated from laboratory.
6. Results and Conclusions
From Measure phase the process was measured with help of SIPOC diagram followed by prioritizing the reasons of COPQ with the help of Pareto chart. It identified unbalanced wall thickness, circumferential waviness and diameter variation as major defects that impact the weight. The process was then measured with the help of Ishikawa diagram that bifurcated the reasons for process variation under head men, material, machinery, process, environment & management. After analyzing Ishikawa diagram, feeder RPM, barrel zone temperatures, connecting head temperatures, quenching temperature, haul-off RPM were identified as critical to process parameters. MSA was executed in the last step of measure phase. It was found that weighing balance needed no calibration as the p value (0.897) was greater than 0.05 & ‘O’ reading was lying within the limits. Gauge R & R testing for micrometer showed that it has poor repeatability however reproducibility of micrometer was up to the mark.
References
- Linderman, K., Schroeder, R.G., Zaheer, S., Liedtke, C. and Choo, A.S. (2004) ‘Integrating quality management practices with knowledge creation processes’, Journal of Operations Management, Vol. 22, No. 6, pp.589–607.
- Singh, B.J. and Khanduja, D. (2010) ‘DMAICT: a road map to quick changeovers’, InternationalJournal of Six Sigma and Competitive Advantage, Vol. 6, Nos. 1/2, pp.31–52.
- Lee, H. and Choi, B. (2003) ‘Knowledge management enablers, processes, and organizational performance: an integrative view and empirical examination’, Journal of Management Information Systems, Vol. 20, No. 1, pp.179–228.
- Roth, A., Schroeder, R., Huang, X. and Kristal, M. (2007) Handbook of Metrics for Research in Operations Management, Sage, Thousand Oaks, CA.
- Nonaka, I. and von Krogh, G. (2009) ‘Tacit knowledge and knowledge conversion: controversy and advancement in organizational knowledge creation theory’, Organization Science, Vol. 20, No. 3, pp.635–652.
- Zahra, S. and George, G. (2002) ‘Absorptive capacity: a review, re-conceptualization, and extension’,Academy of Management Review, Vol. 27, No. 2, pp.185–203.
- Jugdev, K. and Muller, R. (2005) ‘A retrospective look at our evolving understanding of project success’,Project Management Journal, Vol. 36, No. 4, pp.19–31.
- Singh, B.J. and Khanduja, D. (2012), "Developing operation measurement strategy during Six Sigma implementation: a foundry case study", Int. J. Advanced Operations Management, Vol. 4, No. 4, pp. 323–349.
- Choo A., Linderman K., Schroeder R. (2007), "Method and context perspectives on learning and knowledge creation in quality improvement projects", Management Science, Vol. 53, No. 3, pp. 437–450.
- Laws K.J., Gun B.Ferry M. (2006), "Effect of die-casting parameters on the production of high quality bulk metallic glass samples", Mater. Sci. Eng. A, Vol. 425, No. 1–2, pp. 114–120.
- Bendoly E. and Hur D. (2007), "Bipolarity in reactions to operational constraints: OM bugs under an OB lens", Journal of Operations Management, Vol. 25, Vol. 1, pp. 1–13.
- Snee R.D. and Hoerl R.W. (2003), "Leading Six Sigma: a step-by-step guide based on experience with GE and other Six Sigma companies", Financial Times, Prentice Hall, Upper Saddle River, NJ.
- Hoerl, R.W. (2001), "Six Sigma black belts: what do they need to know", Journal of Quality Technology, Vol. 33, No. 4, pp. 391–406.
- Yang, C. and Yeh, T. (2007), "An integrated model of Hoshin management and Six Sigma in high-tech firms", Total Quality Management, Vol. 18, No. 6, pp. 653–665.
- Nonthaleerak P. and Hendry L. (2008), "Exploring the Six Sigma phenomenon using multiple case study evidence", International Journal of Operations & Production Management, Vol. 28, No. 3, pp. 279–303.
- Wiklund H. and Wiklund P. (2002), "Widening the Six Sigma concept: an approach to improve organizational learning", Total Quality Management, Vol.13, No. 2, pp. 233–252.
- Singh, B.J., Khanduja, D. and Singh, A. (2011), Demystifying MSA: A Structured Approach for Indian Foundry SMEs, International Journal of Quality and Innovation, Vol. 1, No. 3, pp. 217-236.
- Singh, B.J. and Khanduja, D. (2011), Introduce Quality Processes through DOE: A Case Study in Die Casting Foundry, International Journal of Productivity and Quality Management, Vol. 8, No. 4, pp. 373-397.
